When it comes to music in your car, the difference between good and amazing often comes down to one thing: your equalizer. And yes, finding the best equalizer settings for cars can feel like both an art and a science. The good news? Once you understand the basics, you can transform your driving soundtrack from flat and dull into rich, full-bodied sound that makes every song feel alive.
Think of your car’s EQ as the mixing console for your personal concert hall on wheels. It’s not just about cranking the bass or boosting treble. It’s about balance and also it’s about tailoring the sound to your car’s acoustics, your music style, and even your own ears.
Let’s break this down step-by-step so you can fine-tune your system like a pro.
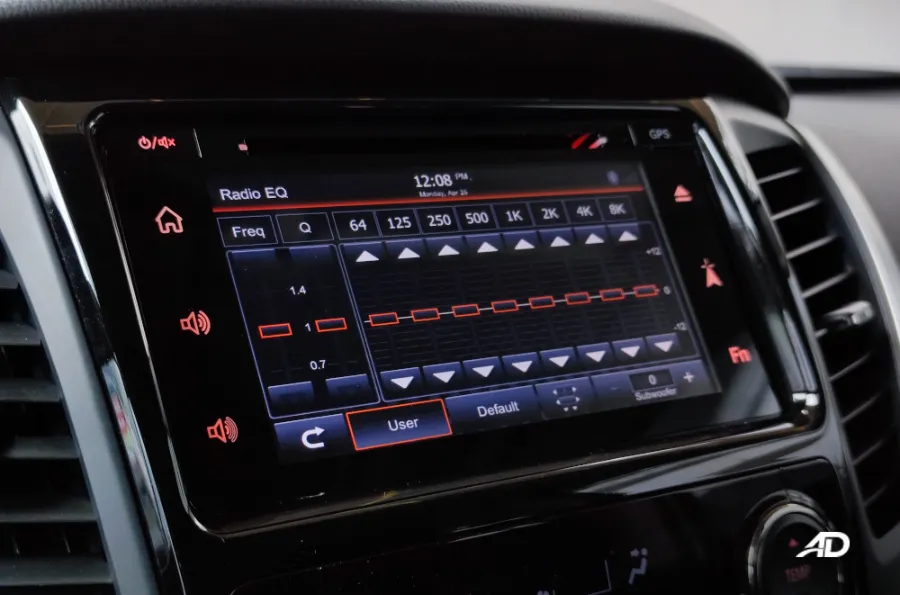
Step 1: Understand What Each EQ Band Does
Before you start sliding those controls, you need to know what you’re adjusting. Most car stereo radios have a 3-band EQ (bass, mid, treble), while others, especially aftermarket systems offer 5, 7, or even 13 bands for precision tuning. Learn more about EQ frequency bands from audio experts.
Here’s a quick guide:
Bass (20–250 Hz) – Low-frequency sounds: kick drums, bass guitars, sub-bass tones. Too much can drown out everything else. Too little, and your music feels weak.
Mids (250 Hz–4 kHz) – Where vocals, guitars, and most instruments live. This is the “body” of your music.
Treble (4–20 kHz) – High-frequency sounds: cymbals, hi-hats, and the shimmer in vocals. Adds clarity and sparkle, but overdo it and you’ll get ear fatigue.
For systems with more bands, the ranges are split more finely:
Sub-bass (20–60 Hz) – The “rumble” you feel rather than hear.
Mid-bass (60–250 Hz) – Punchy low notes that drive rhythm.
Low-mid (250–500 Hz) – Warmth and fullness.
Midrange (500 Hz–2 kHz) – Clarity in vocals and instruments.
Upper-mid (2–4 kHz) – Presence and attack of instruments.
Highs (4–6 kHz) – Crispness and detail.
Brilliance (6–20 kHz) – Airiness and sparkle.
Step 2: Start with a Flat EQ
It’s tempting to start tweaking immediately, but the smartest move is to reset your EQ to “flat” (all sliders at zero or the middle point). This gives you a baseline and eliminates any hidden bias from the previous settings.
From here, you’ll adjust in small increments 1–2 dB at a time. Big jumps in EQ often cause distortion and imbalance.
Step 3: Account for Your Car’s Acoustics
Cars are notoriously tricky listening environments. Unlike a living room with balanced speakers, you’re in a small metal space with reflective surfaces, soft seats, and irregular speaker placement.
Here’s how your car’s layout impacts EQ:
Small cars tend to boost midrange naturally because of how sound waves bounce in a tighter cabin.
SUVs and trucks can produce deeper bass but may lose clarity in highs due to space absorption.
Speaker location (door panels vs. dash vs. rear deck) can skew sound perception, door speakers often emphasize mids and lows, while dash tweeters enhance highs.
Pro tip: Sit in your regular driving position while tuning. What sounds balanced in the passenger seat might not translate behind the wheel.
Step 4: Tune for Your Music Genre
The “perfect” EQ depends heavily on what you listen to most. Your goal is to enhance the core elements of your favorite genre without overpowering other frequencies.
Rock & Metal
- Boost mid-bass (+2–3 dB) for punchy drums.
- Slightly lift mids (+1–2 dB) to bring out guitars and vocals.
- Keep treble moderate to avoid harshness.
Hip-Hop & EDM
- Increase sub-bass (+3–5 dB) for that deep rumble.
- Keep mids slightly reduced (–1 dB) to make bass stand out.
- Boost highs (+2 dB) for clarity in hi-hats and synths.
Classical & Jazz
- Keep bass flat or slightly boosted (+1 dB) for fullness.
- Lift mids (+2–3 dB) to highlight acoustic instruments.
- Boost highs moderately (+1–2 dB) for detail without harshness.
Pop
- Mild bass boost (+2 dB) for warmth.
- Balanced mids for vocal clarity.
- Slight high boost (+1–2 dB) for sparkle.
Podcasts & Audiobooks
- Reduce bass slightly (–1 to –2 dB) to remove low-frequency hum.
- Boost mids (+2–3 dB) for vocal presence.
- Keep highs neutral to avoid sibilance.
Step 5: Use Test Tracks for Precision
Don’t just tune your EQ with random songs. Use high-quality, well-produced tracks that cover a wide frequency range. Ideally, choose lossless or high-bitrate audio files, whether from a CD, wireless streaming, or other high-quality sources.
Some great test tracks for EQ tuning:
- “Hotel California” (Live) – Eagles – Balanced mix of acoustic instruments, vocals, and bass.
- “Billie Jean” – Michael Jackson – Punchy bassline and clean highs.
- “Bohemian Rhapsody” – Queen – Dynamic shifts and layered instruments.
- “Lose Yourself to Dance” – Daft Punk – Strong bass groove and clear percussion.
Play them at your normal listening volume, not maximum. Loud volumes can trick your ears into thinking there’s more bass and treble than there really is. If you’re using a USB or AUX input, make sure the connection is secure and the cable is high quality for the best sound performance.
Step 6: Adjust in Layers
Don’t try to nail it in one pass. Instead, follow this sequence:
Bass first – Get the low end tight and not boomy.
Mids next – Bring vocals and instruments forward without sounding boxy.
Treble last – Add clarity and detail.
After each round, step away for a few minutes. Give your ears a break so you can listen fresh.
Step 7: Compensate for Road Noise
Road noise eats up low and high frequencies, especially at highway speeds. If you mostly drive on highways, consider:
- Boosting bass by +1–2 dB for depth.
- Slightly raising treble for clarity over the noise.
If you’re mostly in the city, you can keep EQ closer to neutral since low-speed driving has less noise interference.
Step 8: Avoid the “Smiley Face” Trap
Many drivers set their EQ like a smiley face, bass and treble boosted, mids dropped. It sounds exciting for a minute, but it’s fatiguing over time. Dropping mids too much will bury vocals and make the music feel hollow.
Balance is always more rewarding than extremes.
Step 9: Fine-Tune Over Time
The best equalizer settings for cars aren’t “set it and forget it.” Your preferences might change depending on seasons (windows up vs. down), road types, or even your mood.
Make small seasonal adjustments:
- Summer (windows down) – Boost bass and treble slightly to cut through outside noise.
- Winter (windows up) – Keep EQ flatter for natural sound.
Step 10: Consider Hardware Upgrades
Sometimes, even the best EQ settings can’t overcome weak factory speakers or poor head units. If you find yourself constantly tweaking but never satisfied, you may need:
- Better speakers – For more accurate frequency reproduction.
- A dedicated subwoofer – For deeper bass without muddying mids.
- Sound deadening – Reduces road noise so your EQ changes are more noticeable.
Quick Reference: Best Equalizer Settings for Cars (Starting Point)
| Genre | Bass | Mids | Treble |
| Rock/Metal | +3 | +2 | 0–+1 |
| Hip-Hop/EDM | +4–5 | –1 | +2 |
| Classical/Jazz | +1 | +3 | +1 |
| Pop | +2 | 0 | +1–2 |
| Podcasts | –1 | +3 | 0 |
Final Thoughts
The best equalizer settings for cars are personal. They’re about making your music sound the way you want it while working with the unique acoustic quirks of your vehicle. Start flat, adjust in small steps, listen critically, and test across different genres.
When done right, your car turns into more than just transportation, it becomes your own private concert hall. And once you dial in those perfect settings, every drive feels richer, more immersive, and simply more enjoyable.